 00:24
00:24
 සමීර මධුෂාන්


As we all know Android SDK Emulator quite slow, which makes
debugging painful. There is a solution for this matter by the guys at Android
x86. Here I will guide you to make Android 4.0 emulator fast. Let’s skip the details and get started.
Note: Click the following links to download Android ISO.
 Download the android-x86-vm-20120130.iso.gz file and extract it somewhere on your computer.
4. Set the “Installer disc image file” to the Android x86 ISO file you just downloaded:

5. Configure a name and location to save the disk image. You can set this to 2.5GB:

6. Once you've completed the start-up wizard, it should immediately boot to a GRUB menu. Select the "Installation" link to start this process.

7. Create/Modify partitions:
Step1: Install VMware workstation
- Go to this link and download the VMware-workstation-full-8.0.2-591240 for your system.
- Install Virtual-box using recommended settings.
Step2: Download Android OS
Android-x86 is a project to port Android open source project to x86 platform, formerly known as "patch hosting for android x86 support".Note: Click the following links to download Android ISO.
- Android 2.2 Froyo - android-x86-2.2-generic.iso
- Android 2.3 Gingerbread - android-x86.2.3-4th-test-110620.iso
- Android 4.0 ICS - android-x86-vm-20120130.iso.gz
Step3: Create new virtual machine
- Run "VMware workstation"
- Go to File ---> New virtual Machine...
- Select "Typical" and click "Next"

4. Set the “Installer disc image file” to the Android x86 ISO file you just downloaded:

5. Configure a name and location to save the disk image. You can set this to 2.5GB:
- The Android OS partitions take about 256MB of disk space.
- The maximum size for a simulated SD card is 2GB.

6. Once you've completed the start-up wizard, it should immediately boot to a GRUB menu. Select the "Installation" link to start this process.

7. Create/Modify partitions:
- Use the arrows keys to select options [New]
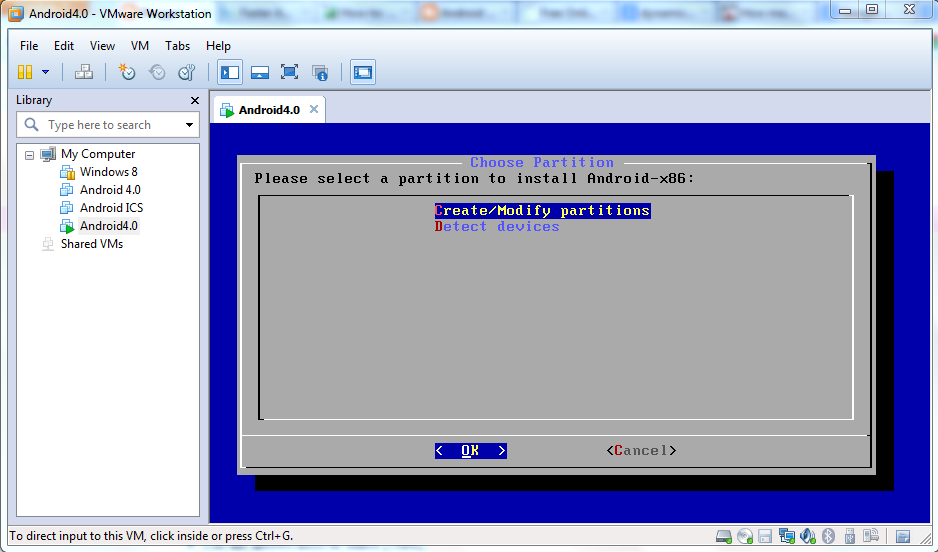
- Then, choose [Primary] to create the first disk partition.
- Accept the default (maximum) and hit Enter.
- Choose [Bootable] to add the "Boot" flag to the partition.
- Select [Write] and confirm your choice to complete partition setup.Create/Modify partitions:

- Quit the Partition Editor.
- Back in the "Choose Partition" window, there should be an option to install Android to "sda1 Linux". Select this and choose OK.
- Select ext3 in the "Choose filesystem" window. Confirm when it asks you if you’d like to format the drive, then confirm again when it asks you to install the GRUB boot loader.
- You probably want to leave the /system drive as read-only. Accept the default and select No when it asks you if you’d like to set this drive as read-write.
- You’ll have an opportunity, optionally, to Create a fake SD card. Do this, then Reboot the Virtual Machine.
- In a few moments, you’ll see a prompt asking which Android (“regular” or Debug mode) to boot. Choose the default first-choice, or wait a few moments for it to auto-select the default.

Test out some of the Android Ice Cream Sandwich features here while you wait for your phone to be updated and also you can use this vm as your new debug tool.
Cheers....!!!
 Posted in: Android

0 comments:
Post a Comment